Posts

Little Girl Dresses

Image
  One of the great things about having granddaughters is that you have someone to sew for.  I bought scads of pink and blue fabric with blocks and numbers when the oldest was born.  I had a pattern but somehow managed to buy way too much of the fabric.  I made an infant sundress and a couple of shirred dresses  and some doll clothes but STILL had quite a bit left over, and since it wasn't cheap I was thinking that as these girls grow this is my last chance to use it before they have completely outgrown the theme of the print.  Well I think it is finally safe to say I have used up every scrap of that fabric. I used Lutterloh pattern 239 from supplement 305.  I had just enough fabric to make three little dresses if I left off the sleeves.  I was ok with that as I saw this as a little summer dress.  Because the girls don't live near me I had to go on faith and a few measurements.  The dresses turned out a tiny bit on the big side but as w...

Child Sizes

Image
  S (just turning 5yo): 21" waist, 18" inseam to bottom of ankle B (will be 3yo in March): 19" waist, 13" inseam to ankle D (just turned 1yo): 18.5" waist, 10" inseam to ankle I love the idea of sewing for the grandkids, but in reality they grow so fast that it is hard to justify the time and effort that goes into a home made outfit.  I just received some new supplements for my Lutterloh collection and one of them was chosen simply because of a child's basic dress pattern.  Working with Lutterloh you only use the chest or hips sizes to lay out the pattern, but I only had on hand the girls' waist sizes.  I decided to look up what Simplicity has for sizing guides.  I think I can work with this.  I have the girls' measurements from their Christmas jammie pants (above) but they are all already like capris so I know the girls have grown since then.  I think I will add an inch to the waist measurements as well as to back waist measurements as they ar...

Time for Tea

Image
  I finished the chair pad covers and love the combination of the blue and brown fabrics so much that I decided to make a coordinating tea cozy.  I found a youtube tutorial  to get me started and bought an applique embroidery pattern to go on it.  There are four layers; the outer skin, a layer of batting, a layer of insulate fabric and the lining.  I used the feather fabric of the applique cup for the lining.  I can't believe how well it works!  I can make a pot of tea and two hours later the tea is still warm.  So it is functional while brightening up my kitchen.  That's the best type of project!

Bionic Gear Bag 2.0

Image
  I bit the bullet, pulled on my big girl panties and had another go at a Bionic Gear Bag.  I struggled with the first one I made but I've got a lot more experience with quilting and binding since then, plus I've found helpful videos for a similar bag on Youtube to hold my hand through the process.  In all the years since I made the first bag the designer never did make the videos available that she frequently mentioned, although some folks have said that she later charged another membership fee to make them available.  I have no idea about the helpfulness of those videos (if they actually were made available) but these videos from other folks definitely helped; this bag turned out MUCH better. I've been on a quilting binge so I though this could be a small scrappy stash buster.  I quilted the outer skin this time.  That is one of the questions I couldn't get a response from the designer first time around, so instead I learned from my experience of makin...

Fiesta

Image
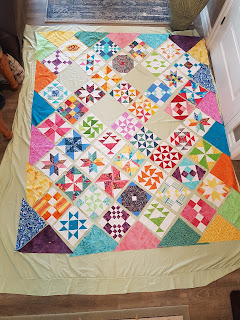
Update April 21:  Most of the blocks are done, just waiting for the patterns for the last 4 blocks.  I've got them all laid out on a sheet and pinned in place along with the border triangles.  You can see the four gaps for the last blocks.  Then it's assembly time.   Blocks 1 - 4 I have started on a virtual quilt-along project for a bright, scrappy quilt.  This is being put on my by local quilting shop and I am so pleased I joined in.  I'm having a lot of fun and learning new things.  For example, on block #12 I initially pieced in rows and then sewed the rows together.  My scant 1/4" seam may have been a bit too scant and my block was oversized to the point that after I trimmed it down I will lose some of my points when I assemble the quilt top.  When I made the second block #12 I instead assembled as 4-patches, trimmed to size and then assembled the block.  This gave me much better results. These are blocks 5 - 8.  I have bee...

WIP's

Image
 I mentioned in my last post that I had been working on a number of projects.  One of them was new covers for my two ironing surfaces; the ironing board and the padded tv tray I use for ironing at the sewing machine.  I also mentioned I may make another Bionic Gear Bag.  Well I decided that was a "go" and I took the plunge to get started.  This time around I found a video for the Sew Together Bag that I think the Bionic Bag was based on.  It is definitely helping.   I pieced and quilted the outer layer to coordinate with the needle case .  Then I cut and interfaced all the other sections and got as far as I could until I was ready for the zippers, which I had ordered on Ebay.  Well those zippers came in today - less than 2 weeks after ordering them from overseas, so I am really impressed! - and now I will be able to carry on with that project. Once I put that aside I decided to organize the eight bins of quilting scraps I had on ha...

The Needle Case

Image
  I have done a LOT of sewing lately.  I summarized my holiday sewing in my last post.  Since then I've made another pair of knit pants for me (because Covid-10 is a thing), a pair for my daughter, a couple of jersey tops, added back pockets to all the knit pants that didn't have any, made a pair of houndstooth dress pants, and I'm sure there's more.  To be honest I was a little tired of clothes sewing and quilt sewing when I ran across the Nancy Zieman needle case project .  Thanks to Ebay and Amazon I have a pretty good stash of needles, and this looked like a good project to practice some skills without getting overwhelmed.   I have seen a few scrappy quilting projects lately that caught my interest and thought this could be a cute little project to try out that idea.  I made scrappy 2 1/2" squares and then used a 2 1/2" sashing strip to showcase some embroidery to make the outer fabric.  I used a heavy natural cotton for the inner fabric....