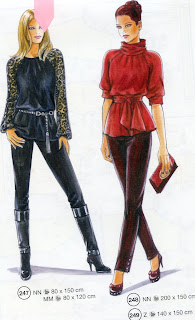
Lutterloh 282 - 249
I had traced out the back of this pattern earlier this summer when I was comparing the shape and size of three different pants patterns. I was initially going to use this black and navy checked ponte to make another pair of Simplicity 1696 but in a knit, but I'm still not convinced that that pattern is fitting as well as I would like. I finally got around to tracing the front of this Lutterloh one as it is drafted for a knit fabric and I could have a go at my first Lutterloh pants pattern.
I did add a set of jean pockets to the back that I copied and reduced by 1/2" in each direction from Vogue 1204.
I ended up having to take the pants in 1" at each side to below the hips, tapering to the knees. This could be a design change because of the pockets on the original version. They were possibly intended to be a bit baggier than how I like to wear my pants. There is no way to tell from the fashion drawing because the top of the pants are hidden by a long blouse. With my alterations they are not tight but they do skim my body. They are definitely not as tight as leggings.
 I made a one piece straight waistband as the Lutterloh patterns always call for, although I made my join at the centre back and tapered it in a bit like the yoke on a pair of jeans. I used 3" wide firm elastic as the waistband facing to eliminate elastic lines and act as a bit of tummy control. Credit for that idea goes to my Nygard leggings. I sewed a contrasting thread in a long stitch to mark my 5/8" seam line. Then I basted the fabric with the edge butted up against that seam line. Finally I sewed the fabric just inside the edge of the elastic with correct thread, stretching a bit as I sewed.
After removing the two white basting threads I flipped the elastic inside and topstitched with the coverstitch which would allow for full stretch. It will make no difference now if the initial straight seam underneath pops upon stretching. I think you can see on the edge of the waistband that the ponte is folded under but the elastic is not. This elastic is too firm to be folded under, as most elastics likely would be. This gave me a nice clean edge. I then used the coverstitch to topstitch over the bottom of the waistband.
The elastic gapes a tiny bit at the top because it is stiff and because it is all one piece it is straight up and down over my curves. Therefore, when I make my next pair I will do the waistband a little differently. I will use the curved back waistband from Simplicity 1696 for both my front and back. I will also cut the elastic in two pieces instead of one so that I can shape it at the side seams. On a second look that is how it is done on the Nygard leggings.
They are quite narrow at the ankle and have four domed buttons. Initially I was only going to sew the buttons on as a faux opening but I ended up doing it properly with an functional opening and working buttonholes. I was going for pewter buttons but these are more of a chrome. They are a bit blingy and I may end up swapping them out for something more subtle. Also the pants are a bit on the long side. I added 5/8" for a narrow hem to the length because I just can't believe that a pattern doesn't have to be lengthened. This probably goes back to when I was a gangly kid and had to have extensions added to the cuffs of all my pants. I ended up making a 1-1/2" hem to give me a 32" inseam and it could be shortened by at least another inch or two because of the narrow ankle. I seem to have a phobia about having too-short pants, even when that's what the style dictates! From what I can see in the fashion pic they end at the top of the back of her shoe. With heels on mine come to the bottom of the back of my foot (top of the heel). I *could* shorten them to remove the bottom buttonhole but I will probably live with them as they are.
 So my final judgement? This Lutterloh pattern worked as well for me as any other pants pattern does. I still don't have the confidence to know what makes a perfect fitting pair of pants, other than I know it when I see it, usually on someone else. I don't know if something should be tighter or looser or adjusted in some other way, and it doesn't help that I can't see myself walking away in whatever I am fitting. You can only check out so much looking over your shoulder in a mirror and you certainly can't see how the garment moves. Maybe I need a videographer to follow me around when I am sewing and fitting! lol


Comments