My Bionic Gear Bag - Pattern Review (long and pic heavy)
 |
| The Completed Bionic Gear Bag |
EDIT: Link to the second bag I made almost seven years later
Well I finally finished my Bionic Gear Bag. What can I say? I laughed, I cried...
This pattern makes a very cute bag and overall I am happy with it. On the other hand I did run into some hiccups and perhaps my timing could have been better with purchasing this pattern. The Bionic Gear Bag was designed by Sally AKA Ripstitcher. She had purchased a similar pattern from Craftsy, made it, reviewed it on her blog, designed her own version that met her needs better, and put it up for sale on Craftsy. The internets went crazy and major drama ensued.
Now I will be honest and say that the first pattern caught my eye in the first place because I saw Sally's review of it. When I then saw the design Sally came up with I thought it would better suit my needs, so I bought it. Unfortunately when I bought it the drama was at its height and even though there was email communication from Sally about appreciating my support with buying the pattern, I didn't get a response to emails asking for specifics regarding the pattern. In other words, pattern support. I'm all for supporting indie designers, but one of the reasons I (perhaps naively) believe you fork out $12 for an indie pattern for a bag is so that you can get clarification from the designer. In theory there is supposed to be a sew-along on the bag's website but it seems to be more of a gallery of completed bags. Beautiful bags, but not really a format for a forum discussion. There is also a tutorials page, but again to date there is only one tutorial about patching together the outside skin if you choose not to cut it out of a solid piece of fabric.
It really wasn't that complicated, and I consider myself an intermediate sewer, but I could have used some direction. The pattern states "I made a very kick-butt (if I do say so myself!) series of videos on this section… just go hit up www.bionicgearbag.com/tutorials and look for the series of Lining Assembly Piece B - 1st Zipper." It also includes a password to access the videos. Well, as of the date of this review (and I bought the pattern a month ago) the only video on that page is the demo one that shows the completed bag and what she has in it. There is no place I can find to enter the password to get more information. And when I sent my first "help" email asking for a link to the videos I got crickets. I understand that she has been heavily involved in the above mentioned drama, and perhaps has not been as attentive to getting the website up and running. But she later send me an email asking me (presumably as part of her mailing list) to forward her Craftsy information to all my sewing friends for them to buy her pattern. I thought "oh good she's back" and sent a second "help" email as as reply to her marketing email (so presumably it didn't get lost in cyberspace) with a basic question about whether the batting needed to be quilted. I am not a quilter and there is no reference to quilting in the pattern even though she suggests batting for lining the outer portion of the bag. So should I learn some quilting techniques before assembling the final skin? After two more days of crickets I gave up waiting for a reply and assembled it unquilted. Looking at the finished bag I think some quilting would have offered some support and structure to the bag. If I do make another one I will either quilt it or use a firm interfacing instead of batting. She alludes that adding the binding may be second nature to a quilter, but it is definitely done differently to a neckline binding where the binding is opened up, sewn down, folded over, raw edges tucked under and then sewn again. In other words the type of bindings I have experience with. And the specifics weren't included in the pattern. Hence more seam ripping on my part. Again, more explicit instructions would be helpful. You can't assume that the customer has any prior experience with a particular technique such as quilt binding vs garment binding and should spell everything out.
This probably sounds like a lot of whining about a lack of hand-holding. Others are posting positive reviews so what's my problem, right? Well I am a visual learner. I am a Tool & Die Maker by trade and I am used to working with blueprints. The pattern includes some pics but to be honest it is not always easy to see the details I am looking for in a pic. Perhaps I am too much of a perfectionist, because I am used to working within such close tolerances, but taking the time to draw out some diagrams would have been SO helpful. There is only one pattern piece included in the pattern and the rest are given as dimensions. I would like a visual to see seam lines, for example. I had to tear apart the sides and redo them because I found the instructions wishy-washy at this point. You are to put a pin in the zipper at a specific point that happens to be about 3/4" from the raw edge, and then sew your 1/4" seam to the left of that. The seam allowance stated has no correlation to the point on the zipper that you are supposed to enclose, and therefore this part of the instructions didn't make much sense to me. So what is the priority - where you encase the zipper or the 1/4" seam allowance? Again, maybe that's just me, but I think a scale diagram or drawing would have been MOST helpful at this point. Or perhaps one of the MIA videos. This could also explain why I ended up with a 10" wide bag when the description says it is 9 1/4" wide. Where did the extra 3/4" go? (For what it's worth I was METICULOUS with my measurements when cutting out) Not that the finished size difference matters to me, but either I'm missing something or the math in the pattern isn't adding up.
I realize that these points are all minor to the completed project, but they did add to a whole lot of frustration for me when you don't know how important a particular dimension is to the success of a completed project the first time you make it. And, at $12, you shouldn't have to make a "trial" version of a project to figure it out. I finally gave up on following the directions and just flew by the seat of my pants, which is why my main zipper is not bound the same as the original pattern. As she mentions several times throughout the pattern, this was supposed to be fun!
So now that I've got that out of my system, I do have to say that the completed bag is well designed for what it is supposed to do. I hope that as the drama becomes a thing of the past that Sally is able to get the website up to where I think she wants it so that support is there for those looking for it. This will be a really good project once she fine-tunes the pattern. I do think it is labeled as being easier than it is with a 2/5 easy rating, at least with the current instructions. I couldn't imagine being a beginner sewer trying to make this bag without additional support or diagrams. And as an aside I first learned to sew 44 years ago.
 |
| I heart my new labels, courtesy of Phoebe |
 |
| The completed interior |
 |
| The wide middle section holds my Pfaff bobbin and foot tray and my magnetic pin cannister |
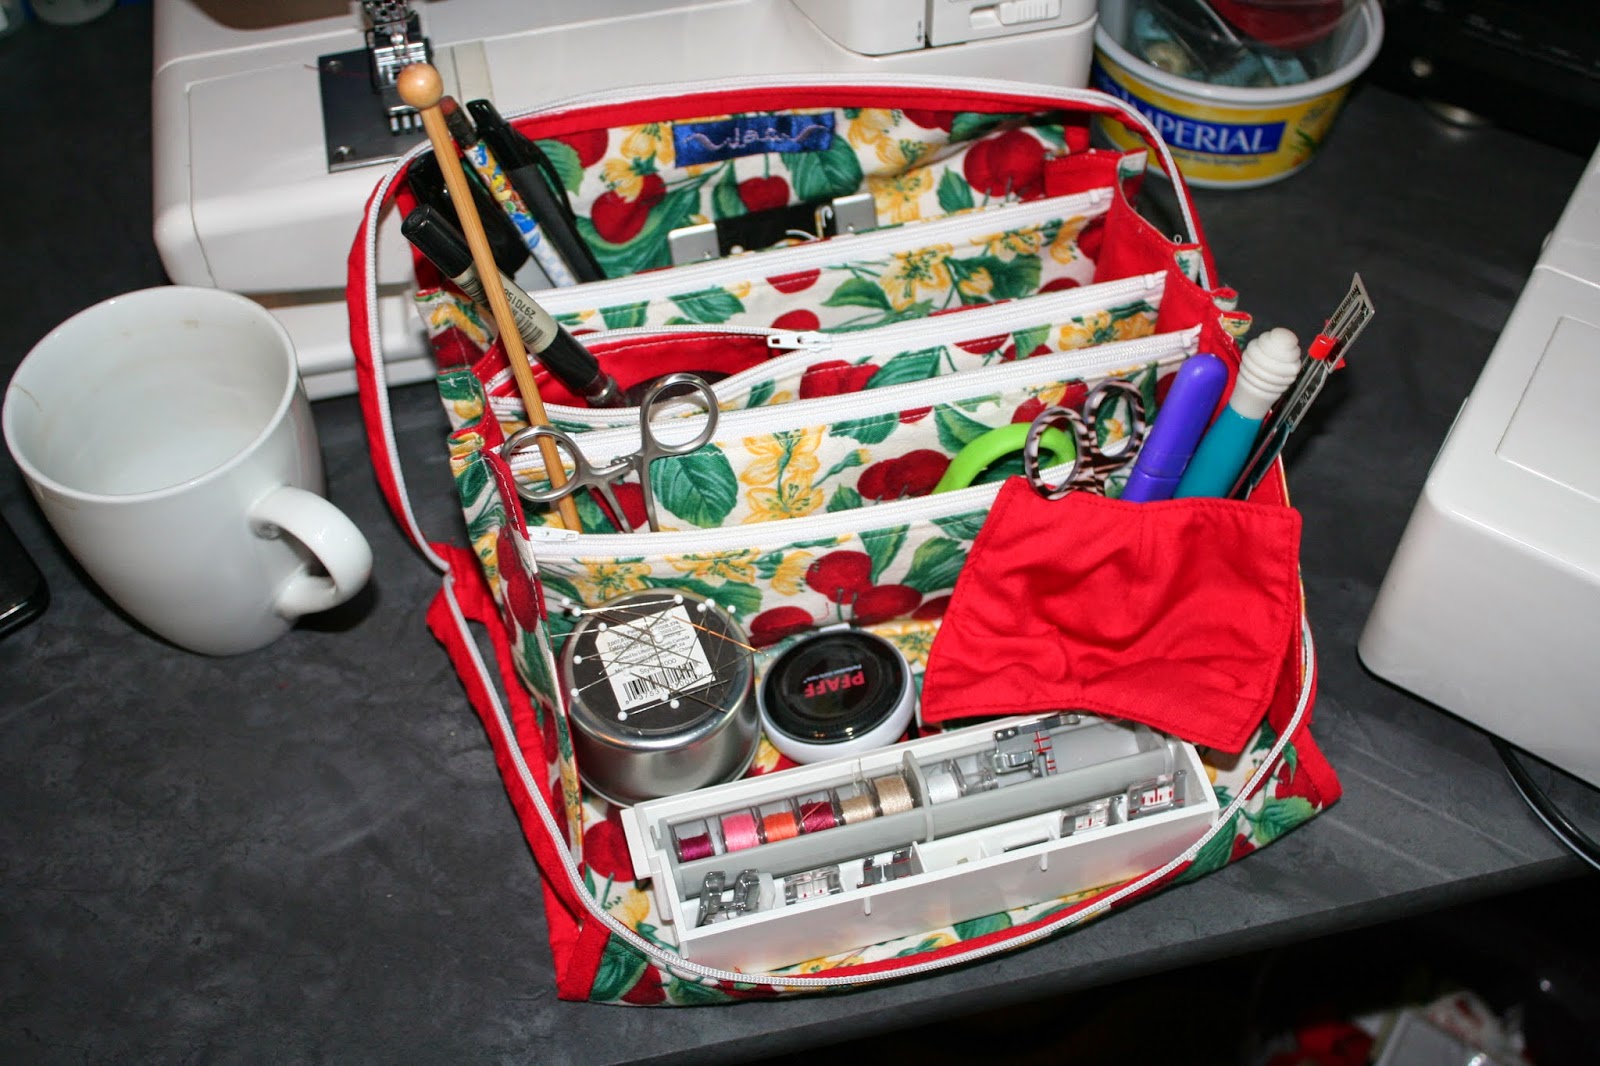 |
| Fully loaded and ready for action! |
 |
| Can you spot the most important accessory in the room? |

Comments
Bag idea is great. I too will write my own concise detailed directions for the next go round. I guess the idea of the chattiness is that it is to be a personal conversation .... actually it interferes with the instruction. Several times it is alluded to trimming the width to 9.25". I never could find where it actually said to do that and mine too is 10" wide. Just before the sides are added it says trim the seam but that is after a 1/8th" stitching line has been done. Trimming would remove that ..... what would that accomplish? I recommend the pattern be given to several sewers to rewrite into a concise usable form. Excited about the bag but disappointed with the process thus far.
Julie I am happy that this worked for you, but this was not my experience, and based on comments left here by others I am clearly not alone in that. I don't have an axe to grind with Ripstitcher, I have no horse in the race over the bag wars, I simply wrote about my own experience with the pattern on my small personal blog (rather than posting it on the Craftsy page). The fact that others were even able to find this review and then post of their own experience with the pattern certainly says something.
Why not just email her with the question; her address and phone number is right there!
As I wrote in my review above, I did email Ripstitcher - several times - with no response. As far as calling, I shouldn't have to make an international call for support, especially when an email address is posted.
My review is intended as constructive criticism and I would hope that Ripstitcher would take it in that light and possibly make some changes to the pattern and website.
I appreciate the pattern writer's intention when making the instructions more of a conversation but it really wasn't successful. The chatter hides the instructions and many things are repeated within those 82 pages. (my version came with two patterns/pattern pieces to print.)
As you can see, I too am googling away for other experiences with this pattern. It's confusing! I recently purchased a bra pattern having never ever made a bra before. The bra pattern came with all of 3 pages of instructions and have more detail and diagrams than this bag. And that is an advanced pattern.
I knew nothing of this BGB or the Sew Together bag until a few days ago so, I have no vested interest in the drama between the designers. I chose to purchase the BGB o ver the STB because the dimensions and extra pouch seem to fit my needs better. I just hope I get this thing together without too much more headache.
Thanks for your post!
It's too bad, it looks like a nice bag.
Repeatedly throughout the pattern there are do x... then a paragraph later.. before you "do x" do this.. the I love the concept and I love the bag, however the pattern does need work
Now I know how it is all supposed to go together, step by step, and I feel confident I can sew the bag without undue frustration.
I am even looking forward to it. 😊
So I encourage folks to check out the tutorials on her web blog.
birdcageandthread.wordpress.com/2015/01/20/bionic-gear-bag-sew-along-part
And NOt on Sally's site.
sorry.
Thank you in advance.
Franny
On my printout of this the second piece on the page (with the triangle on the right) measures 6 1/2" wide x 4 5/8" high.
Hope that helps :)
However, I hate this pattern. The hoopla when Sally released it was because she copied the Sew Together Bag by Sew Demented and just made it bigger and changed some stuff. That pattern was also written very poorly. So neither one of these ladies has any clue how to write a pattern so that it makes sense. The bags though, are great.
I'm wondering if I can rewrite the patterns so that they make sense and post them on my blog for reference = I would not charge for the patterns as they are copyrighted. I'm going to look into doing that though.
I have since seen a Spanish woman who created her own, and a similar pattern offered in German with a great tutorial. Ultimately, I will probably purchase it, but I hate knowing that I am giving Ripstitcher money for a pattern that I will struggle with.
What to do, what to do!
It is actually not a trivial matter and not only can it be very annoying, but it really results in a lot of time and material wastage, and the sewer learns nothing new, except for how to be a frustrated and confused sewer. Not to mention the price is like rubbing salt in the wounds!
I have previously purchased that Sewing Needle Organizer pattern (can't remember the correct name) from the same seller and I was also disappointed with the instructions. VERY chatty ... which would be okay if the actual instructions part of it was clear.
If anyone is willing to share their re-written instructions, or tips, to a new-ish sewer, it will be greatly appreciated. I can even verify that I made the purchase if that would help.
Thanks
Also if anyone plans on using the BGB for anything besides quilting gear, it’s probably not going to suit. It finished up too small for a cosmetic bag. I’m considering redesigning a larger version, writing up a chatter free pattern and marketing it as my own, hahahaha.